About All Tech Buzz

Showing posts with label Windows. Show all posts

HOW TO ENABLE AND DISABLE EVERYTHING IN WINDOWS

The windows operating of this tries to make it hard for users to hide or display various options, features and looks. However, it fails miserably at doing so. The windows registry holds the key operating system. In other words, system administrators can place restrictions on all aspects of the user’s experience using the Windows registry. The easiest way to improve restriction on a user’s activities is by following the steps below:- 

STEP 1:- Click on Start Menu and open run command and type regedit. (WINDOWS + R)

STEP 2:- Search for the following registry key:-

HKEY_CURRENT_USER\Software\Microsoft\CurrentVersion\Policies\Explorer 

STEP 3:- Under this registry key one cam improve a number of interesting restriction that are discussed in detail later in this section. The following new DWORD values can be created in the right pane to improve specific restrictions on the user:-

HideClock: - 

This DWORD value can be used to either disable/hide or enable the system clock normally displayed in the right bottom corner of the screen. A data value of 1 hide the clock, while a data value of 0 displays it.

NoDrives: - 

This DWORD value can be used to hide all drives that are normally accessible through My Computer. A data value of 1 hide the Run option, while a data value 0 displays it. These hidden features of the Windows Registry can be used as a very good prank to play on your unsuspecting friends! However, on a more serious note, system administrators can also use the NoDrives value to restrict the access privileges of a particular user.

NoRecentDocsHistory: - 

Each time one opens a document or a file on a Windows system; it automatically gets added to the Recent Documents list accessible through the Start menu. This list contains the local file access history of a computer and is quite comparable to a browser’s history list. The NoRecentDocsHistory DWORD value can be used to prevent documents from getting added to this list. A data value of 1 removes the list from the start menu, while a data value of 0 enables the list.

NoDesktop: - 

This DWORD value can be used to hide the entire desktop (including all file and folder and system folder). A data value of 1 hide the desktop and all contents on it, while a data value of 0 displays the desktop.

NoSetFolders: - 

This DWORD value can be used to either remove the entire settings folder (including all sub-folder like control panel, printers and taskbar) normally accessible through the Start Menu. A data value of 1 hide the folder, while a data value of 0 display it.

NoSetTaskbar: - 

It removes Taskbar system folder them the Settings option on the Start Menu. This restriction removes the Taskbar and Start Menu items from the Control Panel, and it also removes the properties item from the Start Menu context menu.

NoSaveSettting: -

This DWORD value can be used to prevent your desktop settings from being changed by the user. A data value of 1 protects the desktop settings, while a data value of 0 allows the user to change desktop settings.

DisableRegistryTools: - 

Disable registry editing tools. If you disable this option, the Windows registry editor too will not Word. Create new DWORD and called DisableRegistryTools and its value 1 to disable it and 0 to enable it.

NoClose: - 

It disables Shut Down and prevents the user from normally shutting down Windows. Create new DWORD and called NoClose and Put its value 1 for disable it.

NoAddPrinter: - 

This DWORD value is quite similar to be previous restriction feature, except that it imposes restriction on a user’s ability to add new Printers.

NoFind: - 

This DWORD value can be used to either disable/hide or enable the find option normally accessible through the Start menu. A data value of 1 hide the Find option from the Start menu, while a data value of 0 displays it.

NoStartMenuMyMusic: - 

This DWORD value can be used to either disable/hide or enable the My Music Option normally accessible by clicking on start > Libraries. A data value of 1 hide the option from the Start Menu, while a data value of 0 displays it.

NoSMMyDocs: - 

This DWORD value can be used to either disable/hide or enable the My Documents option normally accessible by clicking on Start Libraries. A data value of 1 hide the option from start menu, while a data value of 0 displays it.

NoSMMYPictures: - 

This DWORD value can be used to either disable/hide or enable the My Pictures option normally accessible by clicking on Start Libraries. A data value of 1 hide the option from start menu, while a data value of 0 displays it.

NoSMHelp: - 

This DWORD value can be used to either disable/hide or enable the Help option normally accessible through the Start Menu. A data value of 1 hide the option from the Start menu, while a data value of 0 displays it.

NoNetworkConnections: - 

This DWORD value can be used to either disable/hide or enable the network and Dial-up connections option normally accessible through the Start Menu. A data value of 1 hide the option from Start Menu, while a data value of 0 displays it.

NoFavoritesMenu: - 

This DWORD value can be used to either disable/hide or enable option normally accessible through the Start Menu. A data value 1 hide the option from the Start Menu, while a data value of 0 displays it. 

NoTrayItemsDisplay: - 

Normally, there are a number of Application Tray Icon displayed in the right button corner of the screen next to the system clock. With the help of a simple registry tweak, it is possible to prevent these items from being displayed. The NoTrayDisplay DWORD entry with a value of 1 means that the tray items shall be hidden, while a value of 0 shall display them.

NoToolbarsOnTaskbar: -

The newer version of the windows operating system allow user to create toolbars that get embedded into the taskbar for quick accessibility. For example, the quick Launch, Address, and Links. The NoToolbarsOnTaskbar DWORD entry with a value of 1 can hide all such toolbars, while a value of 0 enables them again. 

NoNetHood: - 

This DWORD value can be used to hide the Network Neighborhood icon from the desktop. A data value of 1 hides the icon, while a data value of 0 display it.

NoCommonGropus: - 

This DWORD value can be used to hide the common group folders that are normally accessible through the Start Menu. A data value of 1 hide the common group folders, while a data value of 0 displays them. 

ClearRecentDocsOnExit: - 

It is also possible to automatically clear the Recent Documents List each time Windows exits. The ClearRecentDocsOnExit value of 1 enables this features, while a value of 0 disable it.

How To Add Copy To and Move To Option To Right Click Context Menu in Windows ??

Normally, whenever you have to copy or move files one location to another can be a cumbersome process. First you need to right click on the file or folder you wish to copy and select the copy option. Next you need to browse to the destination location and then right click anywhere on it and that select the paste option. However, wouldn’t it be fantastic if you could make the entire process a lot faster and quicker?  There is a simple registry tweak that will add the COPY TO and MOVE TO option to the right context menu of the Windows. As soon as you select either COPY TO or MOVE TO, it will ask you to simply select the destination folder and your job will be done.
Playing around with the Windows Registry can be a dangerous thing to do. Sometimes due to sometimes due to some human error of if something goes wrong while editing the Registry, it is possible for your computer to malfunction. Hence before playing around with the Windows Registry, it may be a good idea to create a backup copy which allows you to recover your computer ever if something goes wrong. But don't worry You can follow each and every steps are carefully and easily. We are try to easy explanation the windows registry tricks. 
This registry tweak can easily he implemented in the following manner:
STEP 1: Click on Start Menu and open run command and type regedit. (WINDOWS + R)


STEP 2: browse the following Registry key:
HKEY_CLASSES_ROOT\AllFilesystemObjects\shellex\ContextMenuHandlers


STEP 3: In the left pane, right click on the ContextMenuHandler key and create a new key called Copy to.


STEP 4: In the right pane, double click on the (Default)string value and enter the following data:
{C2FBB630-2971-11D1-A18C-00C04FD75D13}


STEP 5: Similarly, under the ContextMenuHandler key create a new key called Move to.


STEP 6: In the right pane, double click on the (Default)string value and enter the following data:
{C2FBB630-2971-11D1-A18C-00C04FD75D13}


Step 7: Now when you right click on any File or Folder you will see the option Copy To and Move To being displayed to the right click context menu. Simply select the destination folder and the selected fill will be automatically copied or moved.


How To Add The Encrypt/Decrypt Option to Files and Folders in Winodws ??

Now days, all of us have files on our computer that contain sensitive or private data. Wouldn't it be great if you could encrypt your files easily and quickly by simply right clicking on them?
There is a simple Registry trick available that allow you to add the Encrypt/Decrypt option to the menu that pops up whenever you right click on a file of folder. 
All you need to do is:


STEP 1: Click on Start Menu and open run command and type regedit. (WINDOWS + R)


STEP 2: Browse the Following Registry keys:
HKEY_CURRENT_USER\Software\Microsoft\Windows\CurrentVersion\Explorer\Advanced


STEP 3: In the right pane, create a new DWORD value called EncryptionContextMenu and give it a data value of 1.


STEP 4: Now, whenever you right click on any file of folder you will automatically see the Encrypt option show up in the context menu. Select it and follow instruction on the screen to encrypt the file.


STEP 5: Once the file has been encrypted you will notice that the name of the file appears in green color. Now when you right click on an encrypted file, you will notice that you are shown the decrypt option which allows you to decrypt the file.

As simple as that!

@@ Comment for any type of Queries and Enjoy the Windows Tricks in DIFFTRICK @@

How To Increase Speed of your Computer ??

The processing power of computers has increased tremendously in the last decade. Internet speeds have increased as well, especially with the advent of 3G and 4G broadband connection. However all of us are still always constantly looking for ways to make our computers run faster.
It is obvious that the faster processes and more than RAM you buy, the faster computer will run. However on top of that are some simple tips that can be implemented on your computer to unlock more speed on it..


Disk Cleanup

All Windows systems comes with the Disk cleanup tool uninstalled. It can be accessed via the start menu. The disk cleanup tool search your entire hard drive and tell you which files you can delete safety to free up some on your hard drive. The more space you free up, the faster your computer will end up running. It is recommended that you run disk cleanup tool every 15 days or so n order to keep tweaking your computer speed.


Disk Defragmentation

This is yet another tool that comes pre-installed with windows. Over a period of time, data on your hard drive may get fragmented, which makes your hard drive extra work, hence slowing down your computer. That is why it important data to run hard Disk Defragmenter tool that will defragment tool can be accessed through the START MENU. Microsoft recommends running the Disk Defragmenter tool whenever your hard drive is fragmented more than 10%.


Ready Boost

Read Boost is an option in Windows that allows you to use the memory of a USB flash drive, SD card or any portable flash memory card as cache memory to boost your system performance. As soon as you plug in any pen drive or SD card to your computer, the AutoPlay options should up on the screen there will be an option to speed up my system using windows Ready Boost. Select this option and follow instruction on the screen to enable Ready Boost. Now tour computer will start using extra memory from your external drives to boost its speed and performance.


MS CONFIG

Whenever you start Windows, there are numerous applications that automatically get loaded into memory occupying valuable system resources. It is important to run MS CONFIG tool from time to time check which application is automatically starting with Windows. It is advisable to disable all non crucial application that you don’t actually require or use, in order to free up some memory on your computer. This will significantly improve not only the general speed of your computer but also the amount of time it takes for your computer to boot.


Disable Search Indexing

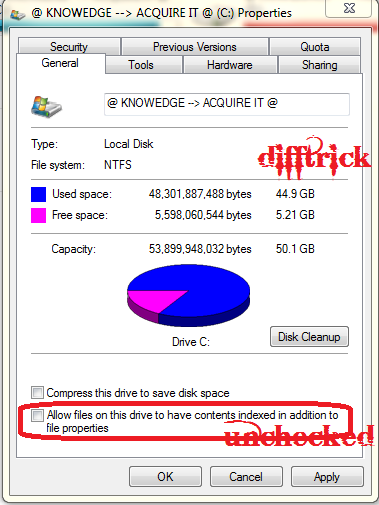
The latest versions of Windows use something as Search Indexing to index your entire hard drive and help you search better and faster.However Search indexing has an adverse effect on the performance of your computer and can slow down your computer. If you wish to disable Search Indexing on your Computer, Search Indexing on your computer, Simply go to My Computer > Right Click on C: and Select Properties > and under the General tab there will be an option to disable Search Indexing. 


Keep Visiting Difftrick for More Windows Hacks and Tricks.

How To Disable "Send To" Option in Windows ??

When you right-click any object on a Windows system, there is the option Send to which is able to literally send objects to other computers by automatically opening a new mail and attaching the chosen file as attachment, process them with other programs selectable from a list, or just moving the file to a different location (hold the Shift key when right-clicking to enable more options to Send to). The common user however does not use this function really often, in fact, he may also find it annoying since it might cause short freezes on slower computers if one accidently hovers the mouse over it and thus makes it load a list of applications. But as for every other problem on your computer there is also a solution for this one, disabling the Send to command with the registry.

STEP 1: Click on Start Menu and open run command and type regedit. (WINDOWS + R)


STEP 2: Browse the following registry key:
HKEY_CLASSES_ROOT\ALLFIlesystemObjects\shellex\ContextMenuHandlers\SendTo


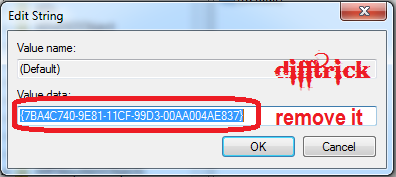
STEP 3: In the right click pane you will see a Default String Value Double click on it and remove its data completely. This will immediately disable the SEND TO option.


STEP 4: You can enable the SEND TO option by changing the data of the above Default string value to {7BA4C740-9E81-11CF-99D3-00AA004AE837}.

That’s you have Enable your SEND TO option.

Keep Visiting Difftrick for More Windows Hacks and Tricks.

How To Disable The AERO Shake Feature in Windows 7 ??

Windows 7 comes with new features known as the Aero Shake features which allow a user to click on the title bar of a window and move the mouse back and forth to minimize all other windows automatically. 
I have personally never found this feature useful and it is actually possible to disable it by simply following the below registry tweak:

Follow the Below Steps:

STEP 1: Click on Start Menu and open run command and type regedit. (WINDOWS + R)


STEP 2: Browse the Windows registry key:
HKEY_CURRENT_USER\Software\Policies\Microsoft\Windows

STEP 3: Right click on the windows key and create a new subkey and call it Explorer.


STEP 4: Once you have selected Explorer, then on the right hand side pane create a new DWORD value called "NoWindowMinimizingShortcuts" and set its value to 1. 


This should disable the Aero Shake feature.

Delete the changes for Enable it...

Keep Visiting Difftrick for More Windows Hacks and Tricks.


How To Add an Application to the Right Click Menu of the Desktop in Windows 7 ??

Normally, whenever you right click on the desktop then you get the standard options like View, Sort By, New and others. However, sometimes it makes a lot of sense to create a shortcut to an application by adding that application to the right menu of the desktop. Think of it’s as an additional way to quickly access your most frequently used application. 
This can easily be done by implementing the Registry trick below:

STEP 1: Click on Start Menu and open run command and type regedit. (WINDOWS + R)


STEP 2: Browse the following Registry Keys:
HKEY_CLASSES_ROOT\Directory\Background\shell


STEP 3: Right click on the shell key in the left pane and create a new key and name it whatever you want to display in the right click menu. I am going to add paint to the right click menu so I will create a new key with the name paint.


STEP 4: Now right click on paint and create another key called Command.


STEP 5: On the right hand side pane, double click on the (Default) String value and in its field, enter the path name of the application you would like to start when somebody clicks on the paint context menu option. In this case, I am going to go ahead and type the path name "C:\Windows\System32\mspaint.exe"


STEP 6: Now when I right click on my desktop, a new menu item called paint has been added to the context menu.


STEP 7: When I click on the Paint option, then obviously Microsoft Paint will start on My Computer.


STEP 8: To remove PAINT from the Right click desktop menu, all you need do is simply delete the new keys that you created. 

As simple as that!

Thank You !!!! And Keep Visiting Difftrick for More Windows Hacks and Tricks.

How To Disable Access to the Windows Registry ??

It is very useful for system administrator to be able to put a restriction on the editing of the Windows Registry for security reasons. This can be done with the help of the following simple registry tweak:

STEP 1: Click on Start Menu and open run command and type regedit. (or Press WINDOWS + R)


STEP 2: Browse the following Registry key:
HKEY_CURRENT_USER\Software\Microsoft\Windows\CurrentVersion\Policies\System


STEP 3:  Create a new DWORD value, DisableRegistryTools and set its data value to 1 to disable registry editing and to 0 to enable it again.


Thank You !!!! And Keep Visiting Difftrick for More Windows Hacks and Tricks.